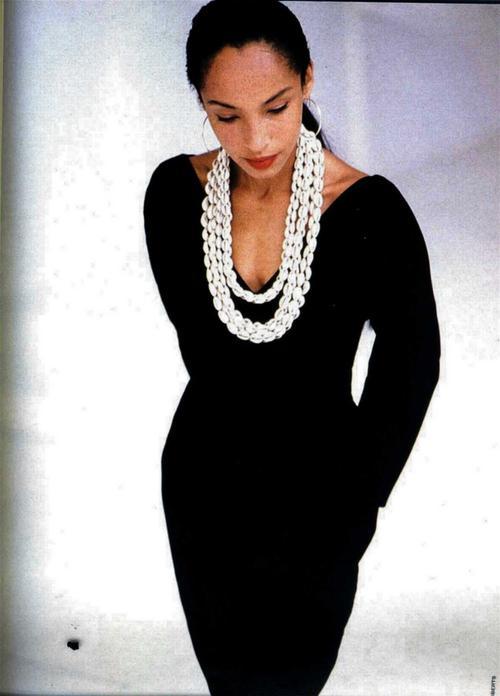
Sade rocking shells instead of pearls! What a great idea!
Sharing inspirational finds for Polynesian Fashion Design, Home Decor, Art & Culture
Tuesday, February 26, 2013
Sunday, February 10, 2013
Tuesday, February 5, 2013
Stylists' Tips for Proportional Dressing
Susan Says: Stylists' Tips for Proportional Dressing
I wanted to find the top tips for dressing
to enhance your best features, so I researched advice from some of the
nation's leading stylists. An especially great resource was InStyle Magazine's February 2012 issue which featured an article entitled, "Figure Flattery: Tricks for Every Body."
Here is a primer on stylists' secrets for how to dress proportionally for your body type:
- For Petites: Keep skirts and dresses above the knee, especially if you are wearing flats. Tim Gunn, stylist on a new television show, ABC's The Revolution, talks about the 1/3, 1/3, 1/3 rule; that is no part of an outfit should exceed 1/3 of your body proportion. Bracelet length is best for sleeves as 3/4-length sleeves give the arms a shorter appearance. InStyle Magazine suggests long chains to lengthen the look of the torso. Avoid, at all costs, pants with cuffs and bulky pockets; stick with straight legs!
- For well-endowed women: Stylist Nicole Chavez, who works with Scarlett Johansson and Rachel Bilson, raved to InStyle about Panache Bras for cup sizes D or larger. To play up a larger bustline, look for fashions with wide straps, nipped waists and open necklines (without showing too much cleavage). Avoid dangling necklaces and showing too much cleavage. If you prefer making your upper body appear smaller, wide leg pants and A-line skirts bring balance, according to stylist Jen Rade who works with Cher and Angelina Jolie. Volume is generally terrible on busty girls. And according to stylist Anabel Tollman, avoid thick sweaters and boxy jackets.
- If you are small on top: Stylist Emily Current, who works with Mandy Moore and Emma Roberts, suggests to InStyle adding volume at the collar, such as ruffles, a loose bow or Peter Pan collar. Avoid chest-length statement necklaces and bandeau tops.
- If you want to accentuate your rear end: Go for a tucked-in shirt with a pencil skirt or tight high-waist jeans, according to stylist Jessica Paster, who works with Emily Blunt and Angie Harmon. Avoid loose-fitting skirts and untucked blouses.
- To draw attention away from your rear end: Look for fingertip-length tunics and jackets and straight jeans; avoid high-waisted anything and white or ivory bottoms. Jeans should be dark and without complicated embroidery on the pockets. Never buy jeans with high pockets as they give the appearance of a larger botom.
- To hide a tummy: The sheath dress was recently touted on The Dr. Oz Show as a way to camouflage the stomach area. Tunics work well and so do A-line tops. Stylist George Kotsiopoulos said in InStyle that light-colored blazers or cardigans work when worn open over something darker to make the midsection look leaner.
- Arms: Tres Sleek De Quart arm shapers are said to reduce arm circumference by one to three inches, magically creating slimmer, sleeker arms! You can find them on lindasonline.com for $29-$31, price depending on sleeve length, either long sleeve or short sleeve.
No matter what your size, don't shy away from this spring's fabulous palette; monochromatic vibrant color works for all figure types!
http://twogenerationsonewardrobe.blogspot.com/2012/02/susan-says-stylists-tips-for.html
Monday, January 28, 2013
Lala Aloha...
![]() |
Tropical Vintage Bikini
Vinatge Shell Necklace |
![]() |
| Photography | Ali Mitton Model | Zoe Crosson Hair & Makeup | Ashlea Penfold Styling | Daniella Ciano |
http://alohabikinilover.blogspot.com/2013/01/lala-aloha.html
Wednesday, January 16, 2013
Summer Sunlight...
![]() |
Bikini Lover Bikini
Spell & The Gypsy Collective Necklace & Cuff
|
![]() |
Vintage Floral One Piece
Shell lei used as head piece from Hawaii
|
Photography | Ali Mitton
Model | Alina Ward
Hair and Make up | Ashlea Penfold
Styling | Daniella Ciano
Saturday, January 12, 2013
Monday, January 7, 2013
Experimenting with homemade 'washi' style tape
Aloha, this is my first experimentation attempting to make my own 'washi' style decorative tape. I see decorative tapes all over the place and had to try some crafts for myself. Ultimately, I'd like to get a system down and use Polynesian clip art, prints and images for possible packaging of my own items.
This is what I made so far. Baby steps first.
I started with an idea to use tissue paper images on my pen. Dug through my gift wrapping tissue stash and decided on this one.
I had this double sided Scotch brand tape already.
Here is the tissue paper out of the package. Just clipped a few images I wanted to try out. Decided on a wahine playing a ukulele and two pink accent flowers. I liked the size of the wahine - fit nicely on my pen. I did use two adjoining strips of tape to get the entire image.
This is how I wrapped the larger image on the pen. It does not wrap completely around.
Here is a side view showing where I put the larger of the two accent flowers across the open area on the back side. The other smaller flower I placed on the pen cap.
Close up of the image. I like how the tissue paper has an opaque look.
Close up of the back side with the joiner flower.
My second project was using a small square piece of Japanese print origami paper I had in my craft supplies also purchase at our local office/craft supply store Fisher Hawaii. It has the texture of handmade paper. This is the section left after I cut my strips and added the Scotch tape to them.
Here is the finished pen. I really like the way the black in the paper goes with the black on the pen. I first tried to wrap the strips of paper around the pen at an angle and did not like the outcome. I decide to try two strips vertically on either side, overlapping a tiny bit. This seems to show more of the design of the paper. Added a horizontal strip to the cap. The strip on the cap is an example of the size of the strips I used - 3/4".
It's not perfect, but I like the look. The overlapping edges are not laying totally flat - I may need to add a touch of some sort of glue or some Mod Podge.
You can see the tape lifting a bit at the top of the pen and in the photo below along the overlap.
Overall - it was a fun project and I really enjoyed using this tape idea.
So.....I used the last paper strip i had taped up to decorate my cosmetic mirror sides.
Close up view. I cut the last 3/4" strip vertically down the middle and used 1/2 on either side of the edge of the mirror.
Then I moved on to see what else on my desk I could decorate..... found some clothes pins. Perfect! I use them to hold back my thin curtains during the day.
Again, I used two different Japanese print origami squares I had on hand. I have to admit, these were a little trickier than the pen to cover. The clothes pins are thin and I had to experiment with the width and length a bit before getting it to fit right. Let's just say I got sticky tape on my nice scissors trying to trim the taped paper to the right size!
Overall - I am hooked on playing with variations of this 'washi' tape trend. It is fun and lets you be so creative. Google or search on Pinterest for decorative or 'washi' tape to get more ideas.
Mahalo for stopping by! Hope to be doing more creative projects of my own in the future to share with everyone.
Subscribe to:
Posts (Atom)


